Technologies like JavaScript or Cookies applications are used by website operators for recording visitor’s behavior. The data is collected without the active disclosure of personal details by the users. This obtained data is then used for personalizing the content and optimizing the website. Many users rely on delete cookies and history or JavaScript blockers to protect their privacy by stopping the data collection.
However, only a few users of the fact that operating system also collects and saves information about the visitor’s surf behavior such as the temporary entries of all the visited websites are generated in DNS cache automatically. The entries or the units containing information in the DNS cache are known as resource records and they are presented in a compressed form in ASCII code. The section below explains why regularly caching DNS flush is useful and how to do it.
Why it is useful to flush DNS regularly?
Just like web browsers, the operating systems also do cache file storage called DNS (Domain Name System) cache. The information about all the websites visited – resource records, IP addresses, and hostnames are stored in cache files.
To lessen the burden on servers during high traffic, DNS caching is performed by some operating systems. TTL (Time To Live) determines the validity period of caches. As long the cache files remain valid, content requests are answered by them without requiring going through the DNS server.
But using updated or corrupt DNS cache files can cause errors and lead to security vulnerabilities. Therefore, it’s recommended to flush the DNS flush regularly.
Below are some reasons to why clearing DNS cache is necessary:
- To prevent tracking of search behavior – storing the DNS records make your browser history easily predictable for hackers.
- Security – the DNS cache files gets easily targeted for DNS spoofing that puts your sensitive information like personal data and login credentials in danger.
- To solve technical issues – the operating system (OS) can be forced to search for updated DNS records to solve technical problems like connection issues and wrongly displaying web content.
How to clear the DNS cache?
There is no rule about the perfect time for DNS flush – until there is any urgent issue that can be resolved by cleaning up the cache. You should clear the DNS cache immediately if you are getting redirected to a website that you did not called for.
It doesn’t matter whether you cleared the DNS cache for any specific reason or just clearing as a prevention measure, there won’t be any such noticeable different on your web experience. After you reset the cache, it will take a little longer only for the first access of any web project if it was loaded previously from saved records of the resources.
The DNS flush process is different for different system. Below we have compiled the instruction to clear DNS cache for every individual operating system.
Let’s get started.
How to flush DNS on Windows 7:
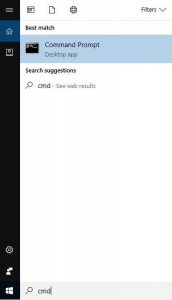
If you are a Windows 7 user then you can use command prompt to run a DNS flush. Start with clicking on the home button of Windows and go to the search bar and type “cmd”. Then click on enter to initiate the command line tool.
ipconfig /flushdns
The DNS cache is cleared by the Windows as soon as you press enter after the command above. You will get the following confirmation message after successfully flushing the cache.

The command “flushdns” also works even without using the space that’s used before the forward slash.
Running a DNS flush on Windows 8:
In Windows 8 also the command prompt tool is used to run a DNS flush. First go to the home button and click on the start menu. Then type “cmd” in search bar by clicking on the magnifying glass icon. Click on the command prompt tool resulting from the search.
Enter the command below for clearing the DNS cache.
ipconfig /flushdns
Press enter to start the flush process. The successful completion of DNS flush will be informed to you via a command line message.
Flush the DNS cache in Windows 10:
In Windows 10 also the command prompt works almost in the same way and the procedure is hardly different from that of Windows 7 and Windows 8. Firstly, you need to use the search for “cmd” to find the command line tool.

Now type the command “ipconfig /flushdns” for clearing the DNS cache.
Flush DNS on Mac
Similar to Windows, Mac Operating System has DNS cache integrated that collects the DNS information automatically so it needs to be cleared on a regular basis. But flushing DNS on Mac depends on the Mac edition you are using. Based on its edition you need to enter different command for different edition to set the DNS register to zero again.
macOS 10.12.0 (Sierra):
sudo killall -HUP mDNSResponder
10.11.0 (El Capitan) and OS X 10.10.4 (Yosemite):
 sudo dscacheutil -flushcache;

 sudo killall -HUP mDNSResponder
OS X 10.10.1 to 10.10.3 (Yosemite):
 sudo discoveryutil mdnsflushcache

 sudo discoveryutil udnsflushcaches
OS X 10.9.0 (Mavericks):
 sudo dscacheutil -flushcache

 sudo killall -HUP mDNSResponder
Flush DNS cache in Linux
There is no DNS cache in the Linux system by default. The various distributions offers only a function for locally storing DNS information by using appropriate applications such as nscd, dns-clean, dnsmasq, or pdnsd. If any of these services are used by you for caching then you need to control it via terminal to clear the DNS cache.
You can clear the DNS cache by running the following command in your terminal:
Solution 1:
sudo /etc/init.d/dns-clean restart
Solution 2:
sudo /etc/init.d/dnsmasq restart
Solution 3:
sudo /etc/init.d/nscd restart
Administrator right is needed to use the caching facility in Linux operating systems like Ubuntu and clear the DNS cache.
Summary
Fortunately, the process of DNS cache flushing is pretty straightforward. DNS cache flush takes only a few simple steps. Firstly, you must know the name of your Operating System (OS) and its version. Then, follow the steps above particularly for your OS and clear the DNS cache just by entering the simple one or two commands.

 Call us at 1-888-GTCOMM1


